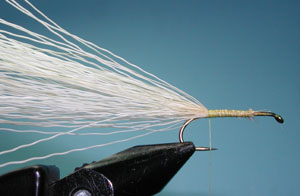
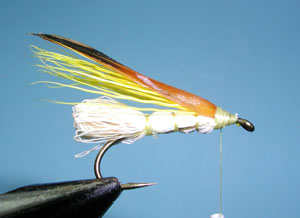
| 1. Lay a base of thread about one eyelength behind the eye to the bend of the hook. Clip a stack of Elk Hair that is about the width of a pencil and even the tips. Place the tips over the bend of the hook so that the tips do not extend beyond the 3/4 position on the shank. Secure with thread wraps and bring the thread back to the bend of the hook.
|
|
|
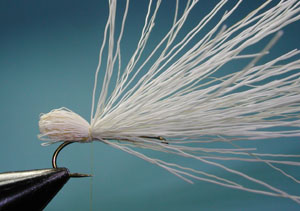
| 2. Bring the hair over itself just past the bend of the hook. Secure with 3-4 wraps of thread. The extended body should only extend about 1/4 of the overall hook length.
|
|
|
| 3. Pull the hairs back and wrap the thread forward around the shank about two eyewidths. With your right hand, bring the flared hairs together over the shank and wrap 3-4 times creating a body segment. Repeat this step until 3 segments are made. Do not go past the 3/4 position on the shank. Trim the remaining butt hairs and secure with thread wraps.
|
|
|
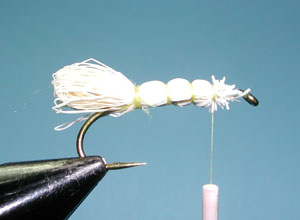
| 4. Clip a segment of dyed yellow Elk Hair and even the tips in a stacker. Attach the clump as an underwing at the 3/4 position with the tips just extending past the extended body. Put a couple of soft wraps behind the tight ones to lessen the flaring of the tips. Trim the butts and secure with thread wraps.
|
|
|
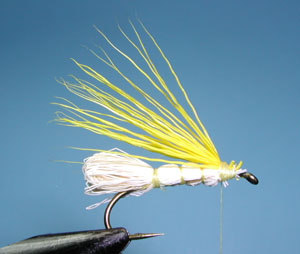
| 5. Prepare a hen feather by lacquering the the fibers. Place the feather on top of the underwing so that the tips of the feather are even with the hairs. Do not remove the basal fibrules of the feather since you want them to wrap around the overwing at the tie down position.. Apply 4-5 tight wraps and trim off the butt section of the feather. Secure with additional wraps.
|
|
|
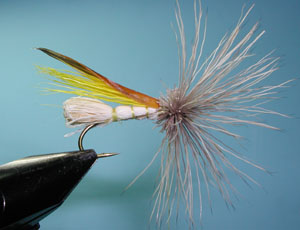
| 6. Clip a segment of Natural Elk Hairs for a collar. Even the tips in a stacker and trim the butts so the length is the same as the body length. Secure the butts behind the eye with two light wraps and tighten, The tightening will spin the hairs around the shank and you can then seucre the butts with 5-6 tight wraps behind the eye. |
|
|
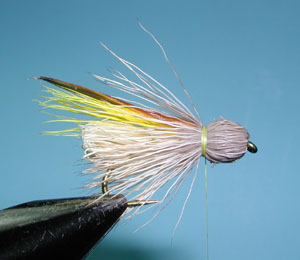
| 7. Bring the Flared Hair tips over the shank so that they sweep back evenly behind the eye. Secure with 5-6 tight wraps forms a bullett head. The tips whould be less than the body length. |
|
|
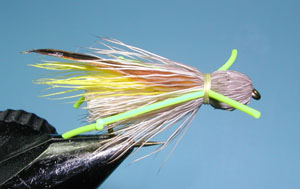
| 8.Clip some rubber leg material that is about twice the shank length. Knot each of them to create a knee. Position the legs along each side of the hopper with the legs bending in towards the body. Secure with thread wraps over the same wraps you made when making the bullett head. Whip Finish and add some head cement to the collar wraps. Trim the collar hairs along the bottom half of the hopper so that the hopper lays lower within the surface film.
|
|
|
©2023 Steve Schalla
This page is not to be copied without
my explicit permission.